
If you’ve been following us for a while, you’ve probably read about us talking about IPv6, the latest IPv6-only mandates in the U.S. government, and technical guidance getting to an IPv6-only state. Continuing along with blog we wrote on Tayga (the open source NAT64 solution), the singular technical holdup in implementing IPv6-only in the enterprise is the IPv4-only statically-coded application. There aren’t likely many of those that exist, but there are enough to cause serious trepidation in removing an entire stack. Well that’s where CLAT comes in as the solution!
C-What?
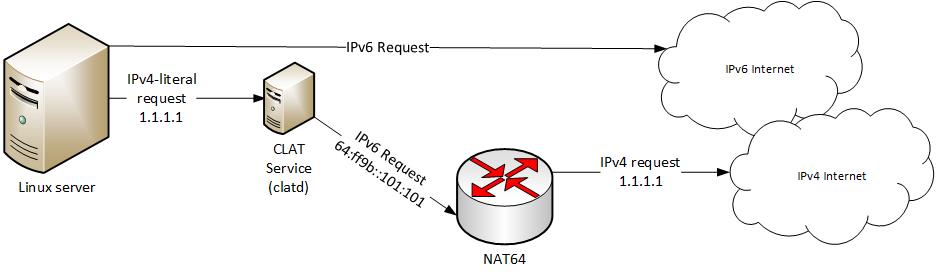
Customer-side Translator, or CLAT, is the client-side shim that builds on the older version of internal system translation called Stateless IP/ICMP Translation, or SIIT. That “shim” goes in between the application and the kernel IP stack. If the application has a literal IPv4 address (e.g. 1.1.1.1) in its code, then that’s where the CLAT comes in. It translates the 1.1.1.1 connection to an IPv6 destination of 64:ff9b::1.1.1.1 – or as represented on the network as 64:ff9b::101:101.That packet will then reach the NAT64 gateway which will translate it to the IPv4-only endpoint. This process allows for the end-point system to only have to have a single, IPv6-only stack enabled and it can still reach everything – provided DNS64 and NAT64 were deployed like in my previous blog. Here’s a good diagram to show you the packet flow of a node going out IPv6 only and an application trying IPv4 only and the CLAT intercepting it and handling it.
How to Implement on Linux
Specifically how to implement this on Linux running Ubuntu 20.04 (and above including 22.04). Follow the steps below as they worked for me flawlessness.
Prerequisites:
- Fully functional IPv6 network
- IPv6 network segments must use Stateless Address Autoconfiguration (SLAAC)
- Fully functional NAT64 integrated into the network using the default NAT64 prefix (64:ff9b::/96) – if using something different then you will have to edit the service configuration files
- Make sure your DNS resolvers point to as functioning DNS64 service (or use a public one like Google’s: 2001:4860:4860::6464 or 2001:4860:4860::64)
Install Instructions
Install build essentials and tayga:
apt-get update
apt-get -y install build-essential tayga git
Now pull down the CLAT package from Git:
git clone https://github.com/toreanderson/clatd
cd clatd
make
make install
Now install all the needed Perl modules:
perl -MCPAN -e shell
install Net::IP
install IO::Socket::INET6
install Net::DNS
reload cpan
Now check to see if the service is running:service clatd status
It most likely won’t be, so enable and start it:
systemctl enable clatd
service clatd start
When you do an ifconfig, you should see something like this:
clat: flags=4305<UP,POINTOPOINT,RUNNING,NOARP,MULTICAST> mtu 1500
inet 192.0.0.1 netmask 255.255.255.255 destination 192.0.0.1
inet6 fe80::14bc:fe60:7470:472a prefixlen 64 scopeid 0x20<link>
unspec 00-00-00-00-00-00-00-00-00-00-00-00-00-00-00-00 txqueuelen 500 (UNSPEC)
RX packets 1 bytes 88 (88.0 B)
RX errors 0 dropped 0 overruns 0 frame 0
TX packets 26 bytes 3860 (3.8 KB)
TX errors 0 dropped 0 overruns 0 carrier 0 collisions 0

wlp2s0: flags=4163<UP,BROADCAST,RUNNING,MULTICAST> mtu 1500
inet6 fe80::226c:9dae:9230:377c prefixlen 64 scopeid 0x20<link>
inet6 2600:4040:2a6b:2f02:c8fb:fdbe:c254:99d2 prefixlen 64 scopeid 0x0<global>
inet6 2600:4040:2a6b:2f02::9083 prefixlen 128 scopeid 0x0<global>
inet6 2600:4040:2a6b:2f02:c195:983f:9ab5:ab35 prefixlen 64 scopeid 0x0<global>
ether 40:e2:30:4f:8e:99 txqueuelen 1000 (Ethernet)
RX packets 7430 bytes 3649111 (3.6 MB)
RX errors 0 dropped 138 overruns 0 frame 0
TX packets 1017 bytes 164764 (164.7 KB)
TX errors 0 dropped 0 overruns 0 carrier 0 collisions 0
*** Take note: CLAT and NAT64 does not work on RFC 1918 IPv4 addresses. This only works with registered/public IPv4 space!
Making sure you don’t see an IPv4 address, type this: ping 1.1.1.1
and you should see this to know it’s working.
ping 1.1.1.1
PING 1.1.1.1 (1.1.1.1) 56(84) bytes of data.
64 bytes from 1.1.1.1: icmp_seq=1 ttl=55 time=7.25 ms
64 bytes from 1.1.1.1: icmp_seq=2 ttl=55 time=11.9 ms
If you need any help, feel free to reach out to us here. We have tested this solution using Ubuntu 22.04 and it works great!
Big thanks to Christian at Henschel.Network for the easy to follow steps that I adjusted only a small bit!