
Ivanti Policy Secure (IPS) has an implementation for doing DoD PKI Token SSH logins using x509 certificates. This method is not the traditional static RSA keys. The information below will show you how to configure each step of the way, as well as some troubleshooting steps.
The Requirements
For the last 20 years, DoD has been pushing hard on IT equipment vendors to provide support for Public Key Infrastructure (PKI) token logins (also known as Smartcards) on all admin interfaces: including the console or Command Line Interface (CLI), or DoD PKI Token SSH CLI Login. Within the last few years the various Security Requirements Guides (SRGs) and Security Technical Implementation Guides (STIGs) have upgraded these to Category 1 issues. Meaning, that these interfaces can now no longer be considered optional, or using more insecure forms of multifactor authentication (MFA) options like passwords and One Time Passwords (OTP).
The following SRGs list out the usage of MFA using PKI tokens as being critical requirements for general network devices:
- SRG-APP-000149-NDM-000247 – The network device must be configured to use DoD PKI as multi-factor authentication (MFA) for interactive logins
- SRG-APP-000175-NDM-000262 – The network device must be configured to use DoD approved OCSP responders or CRLs to validate certificates used for PKI-based authentication
- SRG-APP-000177-NDM-000263 – The network device, for PKI-based authentication, must be configured to map validated certificates to unique user accounts
IPS Configuration
The precursor to the IPS is the old Pulse Secure PPS, just rebranded by its new company, Ivanti. All configuration in the IPS is done on the web user interface.There are a number of prerequisites you must have prior to starting:
- You must have a PKI token/smartcard with a Principal Name defined in the Subject Alternative Name (SAN) attribute. For example, they often look like 1234567890@mil or 1234567890.ADM@mil
- You must have an SSH client that can use x509 certificate-based authentication. There are only (2) that meet this criteria: Pragma and SecureCRT. However, only one of those is using a FIPS certified module: Pragma. You can download a trial license for 14-days for free, but the cost is about $500 per seat (not including support). I have found that Pragma is also much easier to manage with the smartcard authentication than SecureCRT.
- You must have either a modern Cisco or Juniper switch. This instruction is going to only show the configurations for Cisco, but many could be used on Juniper as TACACS+ is supported. I used a Cisco 3750X with IOS version 15.2(4)E10 in the example.
- You must have an Ivanti IPS running at least version 9.1x software – version 22.2x is preferred
- You must also have a smartcard reader
Once logged into the admin web UI go to Authentication-> Auth Servers -> Auth Servers
- On the “new” drop down select Certificate Server then click New server
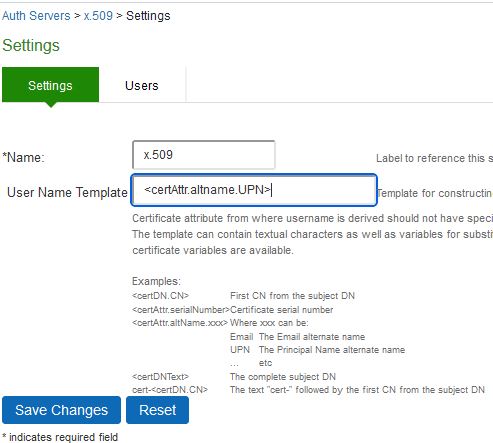
- Create a new name for your cert auth server config
- In the “User Name Template” section replace the text with the following exactly as written:
- <certAttr.altname.UPN>
- Then click save changes
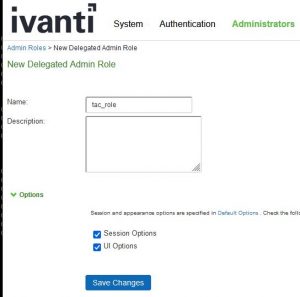
Then go to Administrators -> Admin Roles -> New Admin Role
- make the name “tac_role”
- use the default options
- click save changes
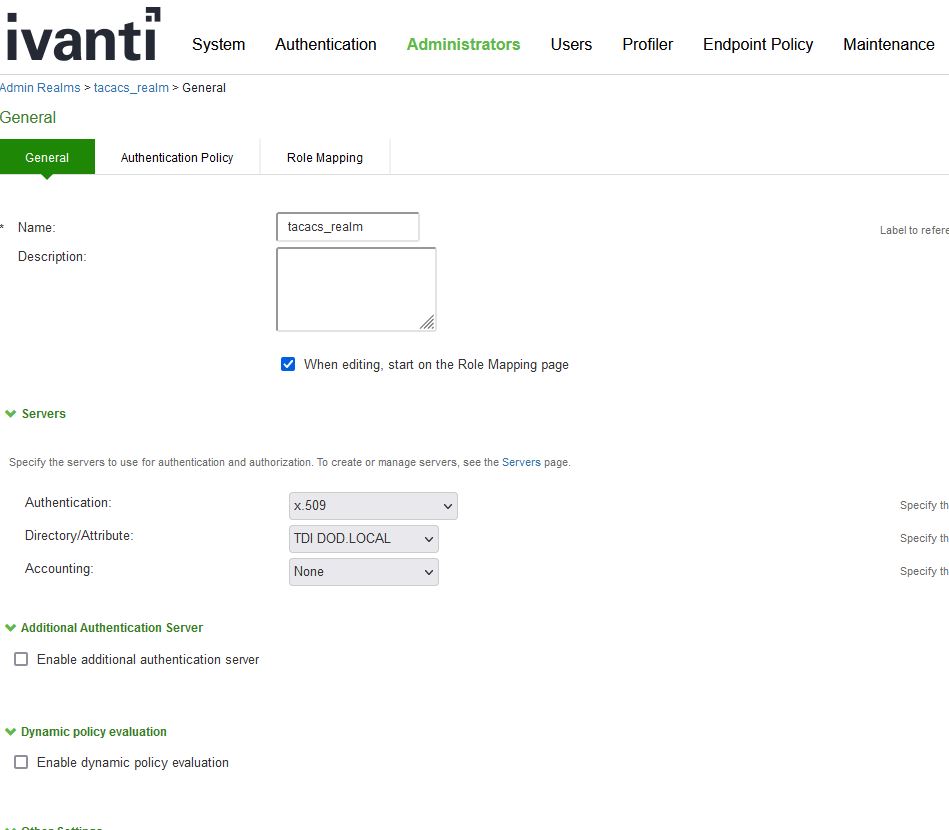
Then go to Administrators -> Admin Realms-> New Admin Realm
- Make the name “tacacs_realm”
- click “when editing, start on the Role Mapping page”
- Under the authentication menu select the Certificate Server you created previously
- Under the Directory/Attribute menu select the Active Directory LDAP authentication server currently in use.
- In current versions of 9.1x and 22.2.x, the role mapping to LDAP group membership has a bug that Ivanti is currently working on, so this feature actually will not work yet. This will be updated when that fix has been implemented. Role mapping will be done per user as shown below.
- Click save changes
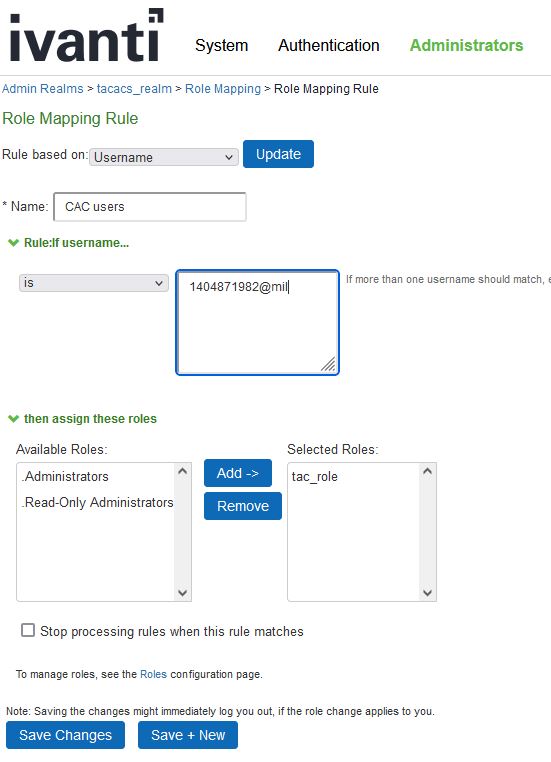
- Under the Role Mapping tab, click New Rule
- make sure the item “Rule based on Username” is selected
- Type a name for the rule
- in the text block after “is” type in all the UPNs of the CAC/token users that will be logging into your switch
- Under “then assign these roles select tac_role and “Add”
- click save changes
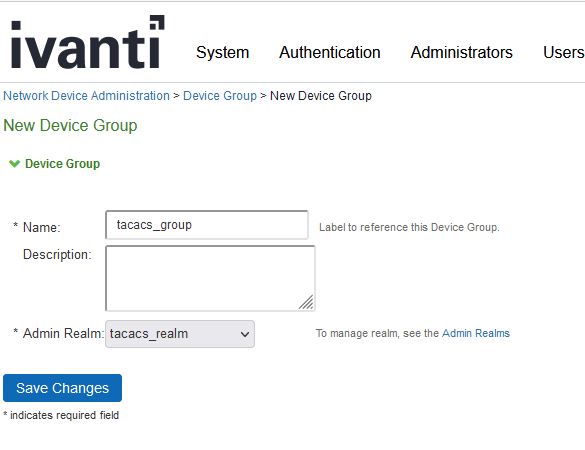
Now go to Endpoint Policy -> Network Device Administration -> Device Groups
- type the name tacacs_group
- Under Admin Realm select the tacacs_realm that was created earlier
- click save changes
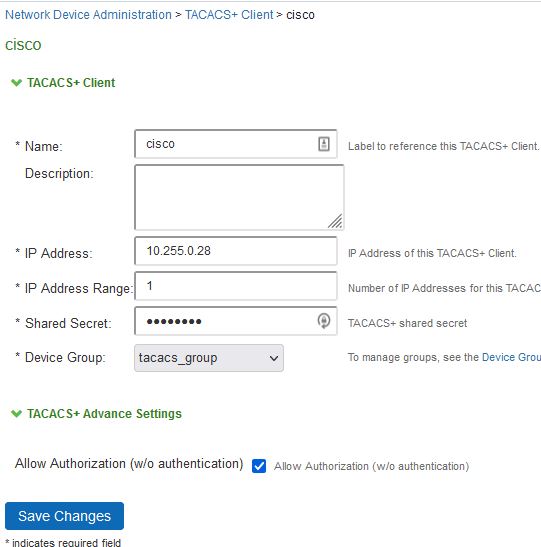
Now go to Endpoint Policy -> Network Device Administration -> TACACS+ Clients
- click New TACACS+ Client
- type the name, IPv4 address, and range of 1
- Under shared secret type the shared secret. For this example we will use testing123
- under device group select tacacs_group
- under TACACS Advance Settings, check the Allow Authorization w/o Authentication
- this means that TACACS is strictly going to be used to check user, role, group, etc. The x509 configuration on the switch will be doing the CAC authentication piece.
- click save changes
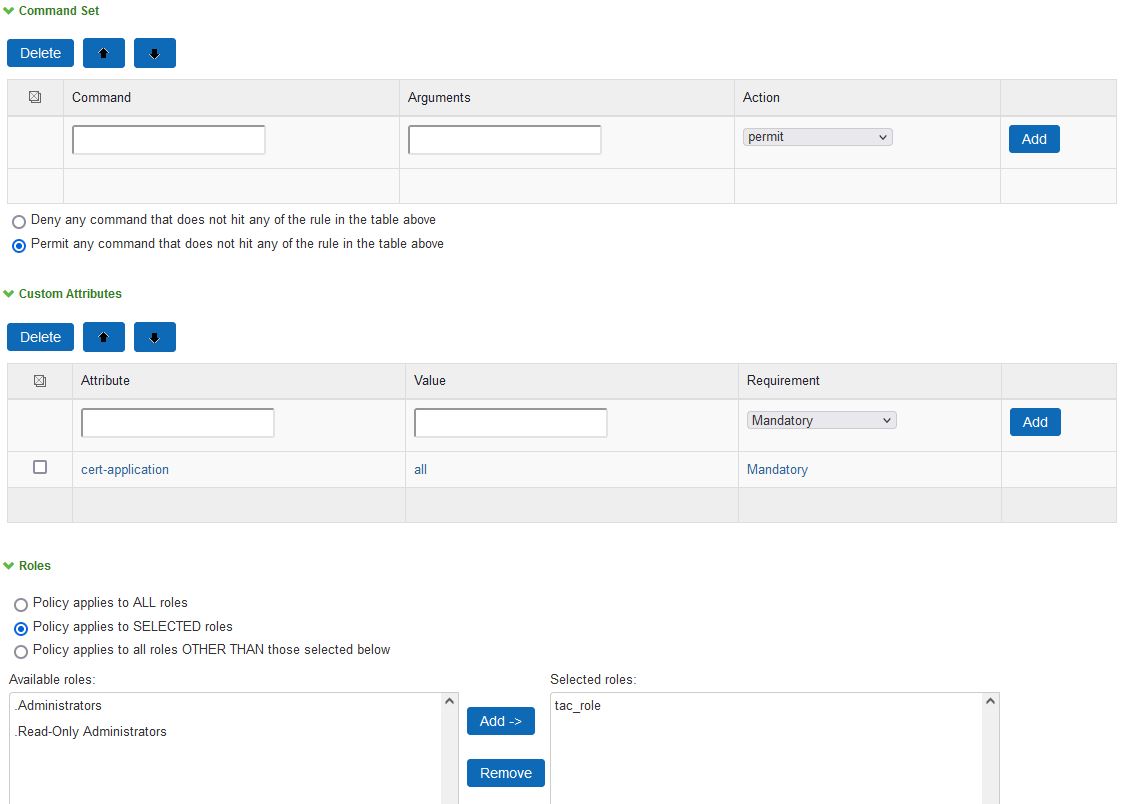
Now go to Endpoint Policy -> Network Device Administration -> Shell Policies
- click new policy
- type a name for your policy
- Under device group select the tacacs_group
- Under shell policy “Default and Maximum Privilege,” select 15 for full admins, or another privilege level based on your environment
- Under custom, attributes type
- cert-application in the “Attribute” text box
- all in the “Value” text box
- Mandatory in the “Requirement” drop down menu
- click add
- under roles, select “policy applies to specific roles,” and select the tac_role
- click save changes

This is the last configuration part on the IPS, now follow the Cisco switch configurations below.
Switch Configuration
Using your standard authentication mechanism, login via SSH to your Cisco switch. Make sure these prerequisites are met on the switch:
- time is correct and accurate to the second
- time is synced via NTP
On the SSH console go into configure terminal mode. In this example we will be using the JITC test CAs and CACs for testing purposes. DoD agencies should use the production DoD CAs. You will need to create the trustpoints for the root and intermediate certificates. For the root certificate do this configuration.
crypto pki trustpoint jitcca3
enrollment terminal
revocation-check none
authorization list PPS
authorization username subjectname commonname
Now add the intermediate CA. This one will include a different username authorization:
crypto pki trustpoint jitcca59
enrollment terminal
revocation-check none
authorization list PPS
authorization username alt-subjectname userprinciplename
Now you need to upload both CA certificates to their respective trustpoints. Since this is in terminal, after entering the below commands, you must paste the base64 text of the certificate on the terminal after issuing these commands:
crypto pki authenticate jitcca3
***paste copied certificate here***
crypto pki authenticate jitcca59
***paste copied certificate here***
Now you need to generate the SSH-RSA keys for usage. Issue these commands:
crypto key generate rsa modulus 2048 label SSH-RSA usage-keys
Configure the SSH keypair-name and SSH version number:
ip ssh rsa keypair-name SSH-RSA
ip ssh version 2
Next, configure the SSH Server (user) certificate profile for each CA:
ip ssh server certificate profile
user
trustpoint verify jitcca3
ocsp-response required
trustpoint verify jitcca59
ocsp-response required
Now set the switch SSH algorithms for use in SSH authentication:
ip ssh server algorithm hostkey ssh-rsa
ip ssh server algorithm authentication publickey
ip ssh server algorithm publickey x509v3-ssh-rsa
Now you need to set the TACACS server configuration. Use the example below (1.1.1.1 is the IP of your IPS and testing123 is the passcode configured on the IPS earlier):
tacacs server PPS
address ipv4 1.1.1.1
key testing123
Set the AAA server to use the configured TACACS+ server:
aaa group server tacacs+ PPS
server name PPS
Configure the AAA authentication and authorization commands. If the emergency login you want to use is not using the local user database, change the default to another server group instead of local:
aaa authentication login default local
aaa authorization config-commands
aaa authorization exec PPS group tacacs+
aaa authorization commands 0 PPS group tacacs+ if-authenticated
aaa authorization commands 1 PPS group tacacs+ if-authenticated
aaa authorization commands 15 PPS group tacacs+ if-authenticated
aaa authorization configuration PPS group tacacs+
aaa authorization network PPS group tacacs+
Finally, to enable and turn all this functionality on, you must enforce it on the trustpoints using these commands:
crypto pki trustpoint jitcca3
authorization list PPS
crypto pki trustpoint jitcca59
authorization list PPS
Do not logout of your SSH session yet! In order to troubleshoot things, I recommend leaving this up. Enable the TACACS debugging on the switch:
debug tacacs
Pragma SSH Client Configuration
Make sure your smartcard reader is connected to your computer and your DoD PKI token/smartcard has been inserted
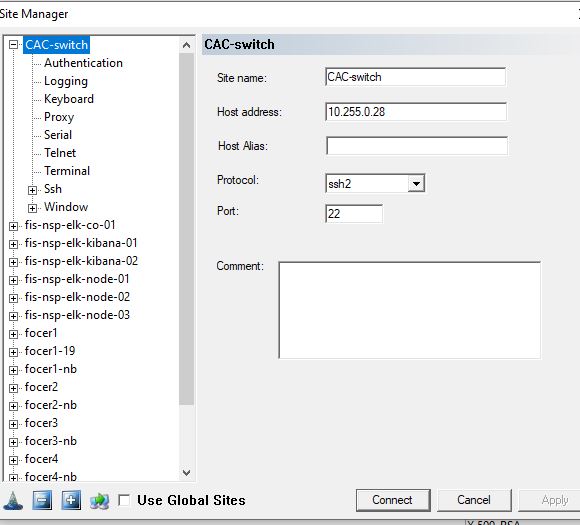
After installing the Program SSH client and adding the license (if not using the trial version), go to the site manager and click the + button
- set a name for your switch under site name
- set the IPv4/IPv6 address or hostname for the host address
- Protocol: ssh2
- Port: 22 (unless your switch listens on another port – unusual)
Next, click the Authentication section in that site
- Select Smartcard/CAC
- select the smartcard reader being used
- Under UserID, make sure that “Fill Userid from SC – Map” is checked and Principal Name is selected

Now click “Ssh” and click SSH version 2 only and check FIPS mode
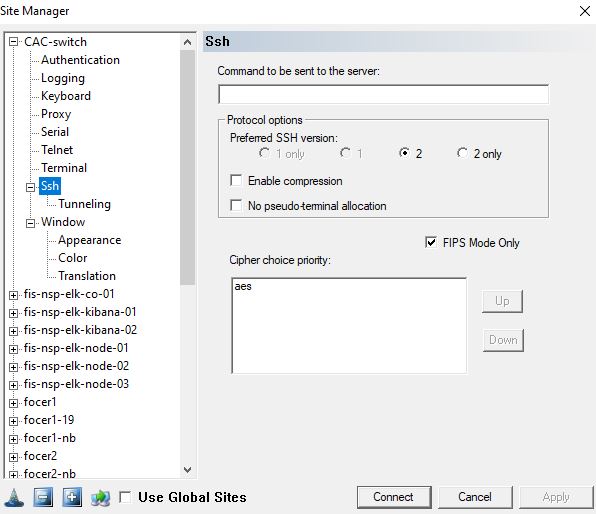
Now click apply and to test by clicking “Connect” button
Part 1: Your process should look like this when successful after clicking connect
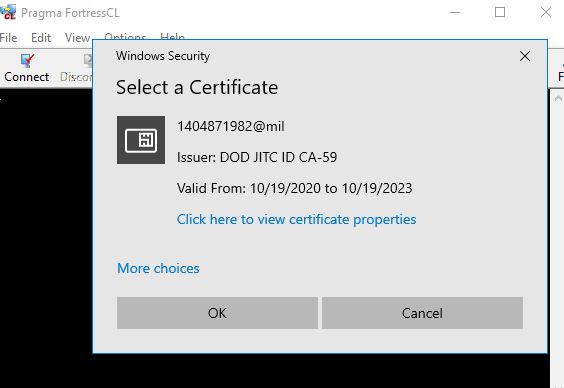
Part 2: Click the cert you are using and click OK and enter the PIN
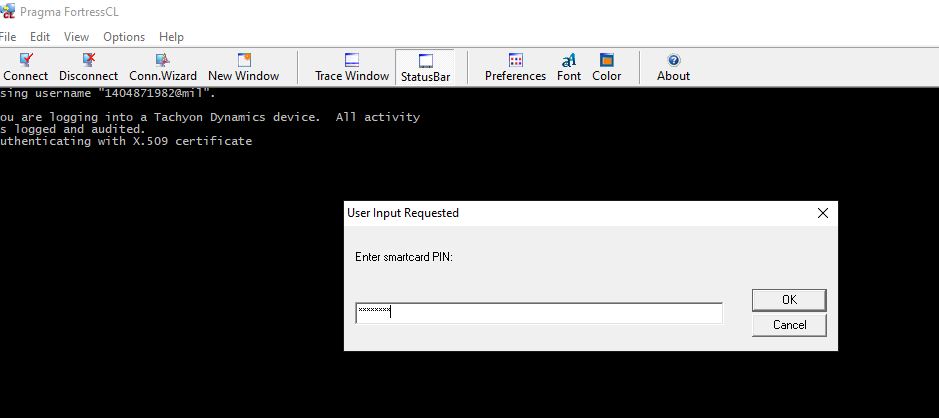
Login should be successful. If it is not for any reason go to the troubleshooting section
Troubleshooting
- Switch TACACS debugging
- on your terminal make sure you set “debug tacacs” and type “term mon.” Then try another login attempt, you should now see all TACACS+ debug messages
- Switch PKI auth/OCSP debugging
- on your terminal make sure you set the following:
- “debug crypto pki transactions”
- “debug crypto pki validation”
- “debug crypto pki validation”
- and type “term mon.” Then try another login attempt, you should now see all the relevant reasons for the PKI login errors debug messages
- on your terminal make sure you set the following:
- IPS debugging
- Go back into the Ivanti IPS web UI and go to System -> Log/Monitoring ->Admin Access -> Settings
- check the TACACS+ Accounting and TACACS+ Authorization messages
- click save changes and click the Log tab
- try another login attempt and see all relevant errors